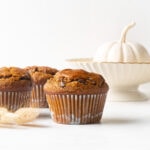
Gluten-Free Pumpkin Chocolate Chip Muffins
These Gluten-Free Pumpkin Chocolate Chip Muffins are tall and fluffy, perfectly spiced with warm fall flavors, loaded with chocolate chips, and dairy-free.
Servings 12 muffins
Calories 345kcal
Ingredients
Dry Ingredients
- 1½ cups (200g) gluten-free flour Bob's Red Mill Gluten-Free 1-to-1 Baking Flour
- ½ cup (50g) almond flour
- 1½ teaspoons baking powder
- 1 teaspoon baking soda
- ¾ teaspoon salt
- 1 tablespoon pumpkin pie spice
- 1 teaspoon cinnamon
Wet Ingredients
- 1½ cups (360g) pumpkin puree
- 1 cup (200g) sugar
- ½ cup (100g) dark brown sugar
- ½ cup (120g) refined coconut oil, melted
- 2 large eggs, room temperature
- 2 teaspoons vanilla extract
- 1 teaspoon lemon juice
Fold In
- ½ cup mini chocolate chips
Instructions
- Whisk the dry ingredients. In a large mixing bowl whisk the gluten-free flour, almond flour, baking powder, baking soda, salt, pumpkin pie spice, and cinnamon. Set the bowl aside.
- Whisk the wet ingredients. In a separate medium-sized mixing bowl whisk together the pumpkin puree, sugar, dark brown sugar, melted coconut oil, eggs, vanilla extract, and lemon juice.
- Combine the wet and dry ingredients. Make a well in the center of the dry ingredients and pour in the wet ingredients. Using a rubber spatula to fold until just combined and no dry streaks remain, do not over-mix.
- Add the chips and rest the batter. Fold in the chocolate chips. Cover the bowl with aluminum foil and allow the batter to rest on the counter for 30 minutes.
- Prepare the muffin pan. Preheat oven to 425°F. Grease a 12-count muffin pan with unrefined coconut oil or line it with cupcake liners. Spoon the batter into the liners or muffin tin depending on what you use, filling them all the way to the top. Bake for 5 minutes. Reduce the temperature to 350°F and continue baking for 20 minutes, or until a toothpick inserted into the center of a muffin comes out clean.
- Let the muffins cool. Remove the muffins from the oven and allow the muffins to cool in the pan for 5 minutes, then transfer the muffins to a wire rack to cool completely.
Notes
Tip for the Best Gluten-Free Pumpkin Muffins
- Weigh your ingredients: The most accurate way to measure your ingredients is to use a kitchen scale.
- Let the muffin batter rest. Resting the batter helps hydrate the flour and creates fluffy moist tender muffins with sky-high muffin domes.
- Grease the muffin pan or muffin liners. Personally, I've never found a cooking spray that works well or has quality ingredients. Instead, I use unrefined coconut oil to grease my muffin tin (if skipping the liners) and it works wonders, trust me. I also haven't found muffin paper liners that do not stick to the muffins. When using liners, I take a pastry brush, dip it in coconut oil, and lightly grease the inside of the muffin liners prior to filling them with batter. This is a great technique that will help the liners to easily pull away from the freshly baked muffins.
- Fill the batter to the top. This will help create tall bakery-style muffin tops.
- Start with a high oven temperature. Starting the muffins off at a higher temperature causes the batter to rise rapidly. This sets the outer surface of the muffin and produces a dome shape. Just don't forget to lower the temperature!
- Fill every other muffin cup. If you want even taller muffins, line a 12-count muffin pan with 6 muffin liners, meaning you’ll only fill every other muffin cup with batter. Bake accordingly and then repeat until all the batter is used. The extra space allows for the muffin domes to expand.
Nutrition
Serving: 1 muffin | Calories: 345kcal | Carbohydrates: 47g | Protein: 5g | Fat: 17g | Saturated Fat: 9g | Polyunsaturated Fat: 0.4g | Monounsaturated Fat: 1g | Trans Fat: 0.02g | Cholesterol: 32mg | Sodium: 259mg | Potassium: 143mg | Fiber: 4g | Sugar: 32g | Vitamin A: 4830IU | Vitamin C: 2mg | Calcium: 87mg | Iron: 2mg